 |
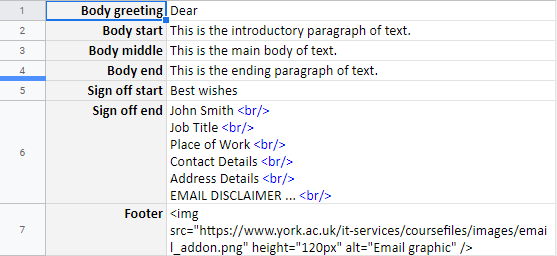
| Screenshot of email content in spreadsheet with HTML |
In the example there are some HTML tags within the spreadsheet text itself - <br/> - which are used to create a new line for each item in the email signature. Without these extra tags the Apps Script code grabs all of the text in the cell (ignoring carriage returns) as one lump sum. The alternative would be to put all of these within the code (as has been done for the other fields) but this limits what the user can then easily update, plus this example allows you to see both possibilities working together.
The actual information being emailed sits in the Data sheet and again just contains some sample information.
getEmailBody.gs
Whilst there are a few script files in use here we will just focus upon the construction of the HTML email. We start by getting the contents of each cell displayed in the above image and storing them in variables.
var bodyGreeting = emailMessageSheet.getRange(1, 2).getValue();Next we look to create our HTML body which requires a bit of structuring so that we display the email content as intended when sent and we achieve this via paragraph tags - <p></p>.
htmlBody+= '<p>' + '</p>';In this example we are also going to include a couple of tags that we will use a 'replace' feature to switch with data directly from the spreadsheet.
htmlBody+= '<p>' + bodyStart + '</p>';
htmlBody+= '<p>' + '</p>';
htmlBody+= '<p>' + "<b>Student ID: </b>" + '<<StudentID>>' + '<br/>';It is important to include a plaintext version of the email content for those unable to view HTML. For this we use line breaks - \n - to separate out the text.
htmlBody+= "<b>First Name: </b>" + '<<FirstName>>' + '<br/>';
plainBody+= bodyStart + '\n \n';
plainBody+= 'Student ID: ' + '<<StudentID>>' + '\n';
sendEmails.gs
The above function then passes data back to our sendEmails function which can start to incorporate data from the spreadsheet and construct the email. We use 'replace' to search for the tag we created above and substitute in the relevant value.
var tempHtmlBody1 = htmlBody.replace('<<StudentID>>', studentID);We do also need to remove the <br/> tags which exist in the spreadsheet for the Sign off however, otherwise they will appear within the email. It is feasible to do this one-by-one but the more efficient method is to use a regular expression (regex) to remove all instances of <br/>.
var tempHtmlBody2 = tempHtmlBody1.replace('<<FirstName>>', studentFirstName);
var newHtmlBody = tempHtmlBody2.replace('<<Surname>>', studentSurname);
var newPlainBody = tempPlainBody3.replace(/\<br\/>/mg, '');Finally we construct the necessary email options to include a HTML body and suitable reply email address.
var options = {htmlBody:newHtmlBody, replyTo:'test@example.com'};Below is a combination of all 4 scripts used to form a more rounded solution, along with a download link.
HTML email body from spreadsheet.xlsx
No comments:
Post a Comment